This article is part of a series that explains how to write an HMI with C# and WPF.
Part 1: this article
Part 2: Create multiple pages and navigation with PRISM
In this article we will see how to create from scratch a simple HMI software, which communicates to a Siemens S7 plc.
We will use WPF and MVVM pattern.
We will also see an implementation of a PLC driver in a service and how to consume the service from the User Interface.
We are going to do:
- Create a simple UI to show the state of a process
- Download a MVVM framework to help us implement the MVVM pattern
- Create the ViewModel associated to the UI
- Create the PLC service to connect to the plc by using Sharp7 driver
Check out the video on Youtube
Create the View
Usually when I create a new program, I start from the User Interface (UI). Thanks to this I can concentrate more on the functionality I need, then move on to the implementation of the low level functionalities.
Here is the UI that we will work with: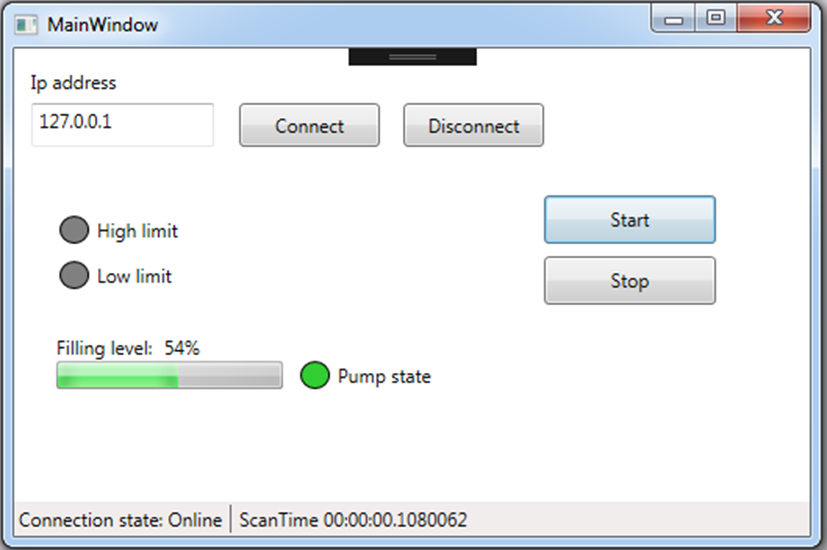
You can take a look at the XAML code to create the UI here.
Choosing an MVVM framework
It’s also helpful to use an MVVM framework, which will save us the effort of writing the boilerplate code to implement all the functionalities. There are lot of frameworks out there, but the two that I use the most are MVVM Light and PRISM.
The two frameworks have a lot of differences, but for this application it’s easy to replace one with the other. In this article I will use PRISM, but in the video I used MVVM light.
To download Prism you should right click on the WPF project, go on Manage NuGet packages, then Browse, search for Prism.WPF, click Install.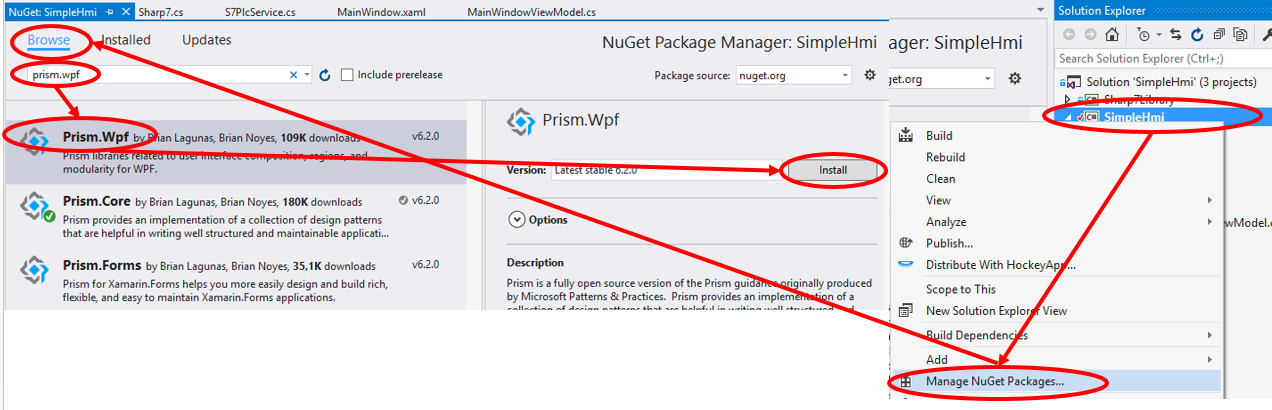
Create the ViewModel
To apply MVVM pattern, we need to create a ViewModel for every View that we have. In this project we have only one View (MainWindow), so we will create only one ViewModel (MainWindowViewModel).
MVVM implies that for every View you should have its own dedicated ViewModel.
Since we started from the UI, we already know all the properties and commands that our ViewModel should contain.
These are the properties:
- IpAddress
- HighLimit
- LowLimit
- PumpState
- TankLevel
- ConnectionState
- ScanTime
These are the commands:
- ConnectCommand
- DisconnectCommand
- StartCommand
- StopCommand
Here is an example of how to declare a property, depending on the MVVM framework you are using (PRISM in this example):
public string IpAddress
{
    get { return _ipAddress; }
    set { SetProperty(ref _ipAddress, value); }
}
private string _ipAddress;
And here is an example on how to declare a command. WPF commands are usually DelegateCommands (PRISM) or RelayCommands (MVVM light), and they expose an Action (that is a method that returns void) to be executed when the command is invoked.
To create a command we have to take 3 steps:
1) Declaration of the command:
public ICommand ConnectCommand { get; private set; }
2) Create the action to be executed, which is just a method:
private void Connect()
{
    _plcService.Connect(IpAddress, 0, 1);
}
3) In the viewmodel, inside the constructor, you have to create the Command instance and pass the Action as a parameter.
ConnectCommand = new DelegateCommand(Connect);
You can read the properties and commands implementation in this file: https://github.com/mesta1/Simple-HMI-with-WPF/blob/master/SimpleHmi/ViewModels/MainWindowViewModel.cs
Binding the View to the ViewModel
To connect the View to the ViewModel, we have to assign to the DataContext of the View an instance of the ViewModel.
The two most common ways to do this are:
1) XAML: when opening the page an instance of the ViewModel is created automatically. This is the way that we use in this example.
<Window.DataContext>
    <vm:MainWindowViewModel />
</Window.DataContext>
2) Code-behind
public partial class MainWindow : Window
{
    public MainWindow()
    {
        InitializeComponent();
        this.DataContext = new MainWindowViewModel();
    }
}
In this project we go with the first approach, for simplicity, but when we will add navigation we will use another approach built-in in the framework that we use. This can be either by a ViewModel locator, or by using DataTemplates. You can read this post if you are interested.
Once we bound the View to the ViewModel, we can assign the Binding and the Commands to our UI elements.
This can be done either by writing them down directly in xaml, or by using the UI of Visual Studio, in the Properties tab.
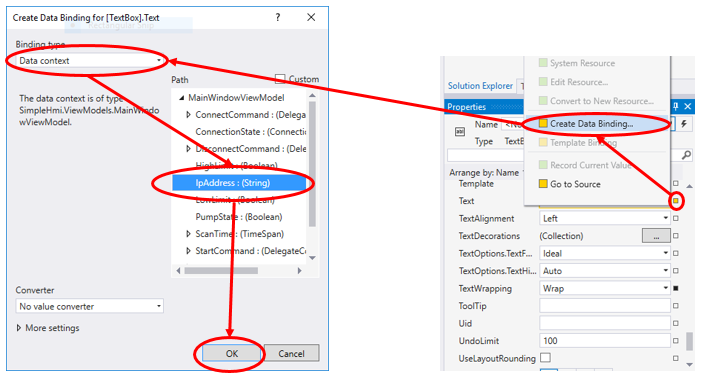
This will output the following XAML, for a Textblock:
<TextBox Text="{Binding IpAddress}" />
Connecting the PLC values to the ViewModel values
Now that our UI is connected to our ViewModel, it’s time to update our ViewModel data from the plc.
To do this we can create a Service (in the example S7PlcService), which is responsible for providing values from the Plc and for executing the commands to the Plc.
It’s the PlcService that contains the plc driver, in this case Sharp7 driver (you can read more about it here).
The reponsibilities of PlcService are:
1) to execute the commands
2) to provide the most actual values from the plc
In order to do this we have to implement:
1) The Connect and Disconnect command
2) The Start and Stop command
3) A timer to refresh the values from the plc constantly
4) An event to notify the consumers of the service (in this case it’s just the ViewModel) that we updated the values and they should be refreshed
We also need to handle somehow the connection errors, with some sort of “Retry” mechanism and alarm logging. This is out of scope of this article. I will talk about it in a future article, when I will extend the application. To handle the errors in this example, I just write them on the “Output” of Visual Studio.
You can read the full implementation of PlcService here.
Read and refresh values
The timer that I used is a System.Timers.Timer. This timer is not executed in the UI thread and will not block the UI when it requests data from the plc.
Notice that the timer is defined once during the construction of the PlcService, and it will last for all the life of the service itself, that usually is the same as the life of the application.
Another feature of System.Timers.Timer is to fire events exactly once every interval, instead of waiting for the complete execution of the callback.
That’s why I call Stop() and then Start() in the OnTimerElapsed callback.
Here is the timer definition:
private readonly System.Timers.Timer _timer;

public S7PlcService()
{
    _timer = new System.Timers.Timer();
    _timer.Interval = 100;
    _timer.Elapsed += OnTimerElapsed;
}

private void OnTimerElapsed(object sender, ElapsedEventArgs e)
{
    try
    {
        _timer.Stop();
        ScanTime = DateTime.Now - _lastScanTime;
        RefreshValues();
        OnValuesRefreshed();
    }
    finally
    {
        _timer.Start();
    }
    _lastScanTime = DateTime.Now;
}
To read the values I just use the Sharp7 functions to read a DB. Notice the “lock (_locker)” to prevent access to the client from different threads. We will talk about this later when we will write the values.
Here is the code to read the values:
private void RefreshValues()
{
    lock (_locker)
    {
        var buffer = new byte[4];
        int result = _client.DBRead(1, 0, buffer.Length, buffer);
        if (result == 0)
        {
            PumpState = S7.GetBitAt(buffer, 0, 2);
            HighLimit = S7.GetBitAt(buffer, 0, 3);
            LowLimit = S7.GetBitAt(buffer, 0, 4);
            TankLevel = S7.GetIntAt(buffer, 2);
        }
        else
        {
            Debug.WriteLine(DateTime.Now.ToString("HH:mm:ss") + "\t Read error: " + _client.ErrorText(result));
        }
    }
}
Once the Refresh of the values has been executed, it is important to notify the consumer of the services that the values were changed through an event, in this case ValuesRefreshed event.
 private void OnValuesRefreshed()
{
    ValuesRefreshed?.Invoke(this, new EventArgs());
}
Defining commands and writing values
Commands that have to be executed on the plc usually imply that you have to write some values on the CPU. The difference between the read, that is asynchronous from the UI, is that the commands are called in the same thread of the UI.
This may cause 2 problems:
1) it may happen that we write while we are reading
2) we may freeze the UI while we write
To overcome the first problem we can use a “lock” mechanism. This will prevent the access to the shared variables (in this case it’s the “_client”) from different threads.
To solve the second problem, we have to be sure that the duration of the command is really short or is asynchronous.
Short commands in this case are Connect and Disconnect. They just open and close the TCP socket (inside the client) and send some data to initialize the communication.
Also connect and disconnect are responsible for starting and stopping the timer for refreshing the values.
This is the implementation of Connect and Disconnect:
public void Connect(string ipAddress, int rack, int slot)
{
    try
    {
        ConnectionState = ConnectionStates.Connecting;
        int result = _client.ConnectTo(ipAddress, rack, slot);
        if (result == 0)
        {
            ConnectionState = ConnectionStates.Online;
            _timer.Start();
        }
        else
        {
            Debug.WriteLine(DateTime.Now.ToString("HH:mm:ss") + "\t Connection error: " + _client.ErrorText(result));
            ConnectionState = ConnectionStates.Offline;
        }
        OnValuesRefreshed();
    }
    catch
    {
        ConnectionState = ConnectionStates.Offline;
        OnValuesRefreshed();
        throw;
    }
}

public void Disconnect()
{
    if (_client.Connected)
    {
        _timer.Stop();
        _client.Disconnect();
        ConnectionState = ConnectionStates.Offline;
        OnValuesRefreshed();
    }
}
The writes of the push buttons are long lasting commands, since we need to write “true”, then Sleep for some milliseconds, then write “false”. In case of a retry mechanism we also have to wait for retries.
For this commands we use the async/await keywords of .Net framework. Basically we wrap the two writes and the Sleep in a Task, then we mark the method “async” and we await the task to be executed.
Here is the implementation of “WriteStart”:
public async Task WriteStart()
{
    await Task.Run(() =>
    {
        int writeResult = WriteBit("DB1.DBX0.0", true);
        if (writeResult != 0)
        {
            Debug.WriteLine(DateTime.Now.ToString("HH:mm:ss") + "\t Write error: " + _client.ErrorText(writeResult));
        }
        Thread.Sleep(30);
        writeResult = WriteBit("DB1.DBX0.0", false);
        if (writeResult != 0)
        {
            Debug.WriteLine(DateTime.Now.ToString("HH:mm:ss") + "\t Write error: " + _client.ErrorText(writeResult));
        }
    });
}
Download the sample code
As usual, you can download the sample code together with the plc program on Github.
Thank you for this cool tutorial – for some reason I’m not able to connect to a real Siemens PLC (S7 1516F TIA V14)
Are there some restrictions?
I also created an DB1 with absolut adressing (DB1.DBx0.0 etc.)
Thanks in advance
There is the plc program attached to the sources. Also you should check the tutorial on Sharp7.
Basically you have to set the CPU security correct, then you have to uncheck the DB optimization in the properties, then verify rack and slot.
https://www.mesta-automation.com/how-to-write-a-siemens-s7-plc-driver-with-c-and-sharp7/
Hi, thank you very much for the quick response! I’ll take look today – thanks for all your work it’s awesome!
Thanks a ton for your tutorials. You are helping many people with these tutorials. These tutorials are complete and very interesting.
Thank you for tutorial. Will it work with B&R X20CP1484 plc or only siemens models ?
I quickly googled B&R C# and it seems there is an interface that you have to implement. In this article I use Siemens and in the 3rd one also Modbus. You can use these as guidance to implement your own interface to B&R.
https://www.br-automation.com/en/products/software/utilities-tools/automation-device-interface-adi/
https://www.br-automation.com/en-au/downloads/software/hmi-software/automation-device-interface/dwldwl10000067062/
Hello!
Thanks for this great article. Could you please show us how we will run motor while key is pressed and stop motor while key is released?
Check this repo, there is an implementation of PushButton for WPF that observes the ButtonPressed.
https://github.com/mesta1/WPF-friendly-touch-checkbox-and-radiobutton
Hello!
Your article is very helpful to me to bulid a communication between siemens PLC and our customized MES software. But we have a problem about how to get the TagList in PLC just the WinCC does(reading Tags form AS). Do you have any soluton or suggestion?
Thank you!
Hello really good article.
I’m just starting with MVVM and i have one silly question.
I’ve created inside SimpleHmi.PlcService
class like this
namespace SimpleHmi.PlcService
{
public class Pos
{
public float x;
public float y;
public float z;
}
}
inside MainPageViewModel.cs i have public variable
private Pos _mp;
public Pos Mpos
{
get { return _mp; }
set { SetProperty(ref _mp, value); }
}
which is refreshed from DummyPlcService
Everything works fine. But i cant figure out how to bind Pos.x to textbox in MainPage.xaml. Approach like this not working Text=”{Binding Mpos.x}”
Is it possible to do this, or i completely wrong with this?
Get it to work by adding accessors
public class Position
{
public float X { get; set; }
public float Y { get; set; }
public float Z { get; set; }
}
but now next problem. Values in MainPage is refreshed only once, on program start.
Also these variables need to be BindableBase and with SetProperty.
It would be better if you expose the properties directly from the viewmodel. For example instead of doing {Binding Mpos.x} you should do {Binding MposX}, and in the viewmodel you do MposX = Mpos.x.
Thanks for the answer.
It was my first approach {Binding MposX} and than MposX = Mpos.x
But what if i have more than one objects of type Position. In this case i should write many lines of code in ViewModel to expose all of this props. Instead Mpos= _dummyPlcService.MPos;
Real example from industrial automation world.
Lets say we have object motor
public class motor
{
// Status
public bool RunFwd { get; set; }
public bool RunRev { get; set; }
public bool Stopped { get; set; }
public bool Interlock { get; set; }
public bool PosLim { get; set; }
public bool NegLim { get; set; }
public bool QTrip { get; set; }
public bool CntFwdFlt { get; set; }
public bool CntRevFlt { get; set; }
//Control
public bool Mode { get; set; }
public bool aRun { get; set; }
public bool aDir { get; set; }
public bool mRun { get; set; }
public bool mDir { get; set; }
public bool ACK { get; set; }
}
and we have 10 motors. What in this case?
public class motor: BindableBase
and with SetProperty ?
There is business logic and there is UI logic. In WPF BindableBase is for UI logic and it goes into ViewModels.
In your example you have 10 motors, each with 15 properties.
Are you showing 150 fields in a View ?
If yes, the motor has to implement BindableBase and all it’s properties have to implement SetProperty. Then the motor properties are updated in the ViewModel that own the motors and you probably want to name the class MotorViewModel.
If no, then you can create a subclass of data for each motor that you want to show in that ViewModel, like “MotorPositionsViewModel”, or “MotorStatusViewModel”.
Sometimes when data are static you can show the business objects directly, to save yourself some code. But as you saw, the UI doesn’t update them if they don’t implement BindableBase.
If you don’t separate UI from business logic, you see that the classes grow and it become difficult to maintain them. When you see ICommands in business objects and BindableBase implemented everywhere, that’s a sign of poor MVVM.
Hello Mesta,
Thanks for your great tutorial. After them, I can connect, read/write data from/to my PLC.
But I got small problem. Sometimes, when I clicked buttons or entered new data to textboxes continuously, the fault came.
Actually, the PLC still received data when I kept clicking buttons or entering new data, but the HMI stopped show them.
So, could you please take a look at my code (attached file on the link below), and give me some advice.
https://github.com/banbedangki/Communication-between
Thank you so much :)!
Problems are multiple.
The ?. from ValuesRefreshed?.Invoke(this, new EventArgs()); has been removed but you should check for ValuesRefreshed null.
The singleton is not thread-safe
SetInf should be awaited.
On MainWindows.xaml.cs there is a lot of code that should be in the viewmodel and replaced with a subscription to property changed.
Also there should be checks for errors when reading and writing on the plc.
I can’t guarantee that fixing all of these problems will solve the issue, because I can’t test without the plc program.
Maybe you can start from scratch, instead of putting your logic into the example of this article.
This example is the first part of 3 articles and it wasn’t meant to be production-ready code, but just a guidance.
I think you are doing good, just go the simple way that you know and don’t follow blindly this example. Things will be easier.
And you should use the last version of Visual Studio and Resharper. These tools will help you.
Good Morning Mesta,
Thank you so much for your advices. Actually, I just a newbie in C-Sharp.
After read your articles, I recognized that I still have so many things to do.
I’ll try to code from scratch with simple way which I understood.
Thanks :)!
Hello, Thank you for the well explained tutorials. Could you please tell me if its possible while using S7.net library? What are the required changes. Your reply will be very much appreciated. Thank you
Hello Mesta,i download this project and it work fine with plcsim,it can read and write .
but when i down tia project to real plc(S7-300),read is ok ,write “Start”is ok ,but when write”Stop”,the “DB1.DBX0.1” can`t change.(there is no erro occur)
i try another simple test project-just change “db2,dbx0.0″,”db2.dbx0.1″,”db2.dbx0.2″,i found just the”db2.dbx0.0” work fine,the others can`t work,but all of this work fine with plcsim
i try it with: CPU(315-2DP):6ES7-2AH14-0AB0,CP343-1:343-1CX10-0XE0
thanks
i think i found the reason,the function named SetBitAt made the buffer to “2”when value=true,plcsim know that “2” is non-zero,but the real plc can`t(the real plc can only know 1 or 0)
so i modify the code:
private int WriteBit(int db, int pos, int bit, bool value)
{
lock (_locker)
{
var buffer = new byte[1];
//S7.SetBitAt(ref buffer, 0, bit, value);
if (value)
{
buffer[0] = 1;
}
else
{
buffer[0] = 0;
}
return _client.WriteArea(S7Consts.S7AreaDB, db, pos*8 + bit, buffer.Length, S7Consts.S7WLBit, buffer);
}
}
it work fine.
I have read all your article and please keep sharing
Hi,
I tried the code and it works fine, but it seems that the code can only write to the first 7 bits of a db.
Is there any solution?
kind