This article explains some approaches to create the architecture for a WPF application when using dependency injection. In particular we will see how to navigate through views and how to deal with dialogs, both windows and system dialogs.
This article is divided in 2 parts.
Part 1 (this article):
- Creation of sample application
- Design data
- Navigation between child ViewModels from a parent ViewModel
- Bootstrap the application
- Navigation from a child ViewModel to another child ViewModel
- How to show dialog/modal windows
- How to close the dialogs
- MessageBox and other system dialogs
- Unit test the navigation
Frameworks used:
- Castle Windsor: DI container
- MVVM light: for Messenger, ViewModelBase and RelayCommand
- MsTest: for unit tests
- Moq: for mocking the services
If you are new to dependency injection…
… you may want to check these slides.
[slideshare id=40677443&doc=dependencyinjection-therightway-141024062523-conversion-gate02]Creation of the sample application
In the sample application we have to navigate through 3 views (UserControls). So we create 3 views and 3 viewmodels.

As you can see I am not using the classical “Views” and “ViewModels” folder organization. I think that grouping Views, ViewModels, Factories and Interfaces by “features” is easier to maintain, especially when the application grows.
Because we use ViewModel-First approach, we need to assign the View to the ViewModel through DataTemplates. We will do this in App.xaml.
<Application […]
             xmlns:views="clr-namespace:WpfNavigationExample.Views">
    <Application.Resources>
        <DataTemplate DataType="{x:Type viewModels:FirstViewModel}">
            <views:FirstView />
        </DataTemplate>
        <DataTemplate DataType="{x:Type viewModels:SecondViewModel}">
            <views:SecondView />
        </DataTemplate>
        <DataTemplate DataType="{x:Type viewModels:ThirdViewModel}">
            <views:ThirdView />
        </DataTemplate>
    </Application.Resources>
</Application>
Design data
For every View that we create, we assign the design data to the corresponding ViewModel. When doing ViewModel-First, we can assign design data in this way:
<UserControl […]
             xmlns:d="http://schemas.microsoft.com/expression/blend/2008"
             xmlns:mc="http://schemas.openxmlformats.org/markup-compatibility/2006"
             mc:Ignorable="d"
             d:DataContext="{d:DesignInstance viewModels:FirstViewModel,
                                         IsDesignTimeCreatable=True}">
To create the design data, the ViewModel must have an empty constructor. This can be a problem when using dependency injection, because the most common way to inject the dependencies is in the constructor.
This is the error that we receive when our ViewModel has “No parameterless constructor defined for this object”.

To deal with that, we create a parameterless constructor that will call the standard constructor. We have to make sure that it will be used only for design data. This is an example of design mode constructor:
[Obsolete("Only for design data", true)]
public MainWindowViewModel() : this(new FirstViewModel(null), null, null)
{
    if (!this.IsInDesignMode)
    {
        throw new Exception("Use only for design mode");
    }
}
The obsolete attribute is used to throw a compilation error in case someone uses the empty constructor in the code, the Exception instead is used in case the container uses the wrong constructor.
Castle Windsor will always resolve the constructor with the most parameters. If some parameters are not registered in the container, it will use another constructor.
There are other ways to create design data:
- We can create a parameterless constructor and resolve all the dependencies with ServiceLocator, but this actually hides the dependencies.
- We can create for example an IMainWindowViewModel interface, which contains all the properties and commands.
Then we create a class specifically for design data that implements the IMainWindowViewModel interface.
This adds a bit of overhead to maintain, because for every ViewModel you need to create an interface and a specific class for design data. - If we provide a constructor like in the example, we reuse the logic we use for the real ViewModel and we have to mock only the services. Having two constructors is not a big problem, because the container will take care of them.
Navigation between child ViewModels from parent ViewModel
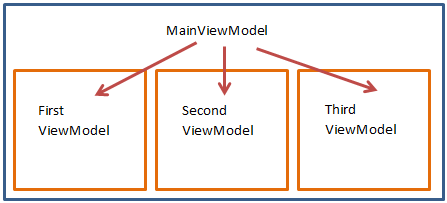
The first navigation that we create is of hierarchical type and will use the MainViewModel. You can see this type of navigation in MsOutlook. This navigation needs the ViewModel to contain all the child ViewModels and swaps through them by setting a CurrentViewModel property.
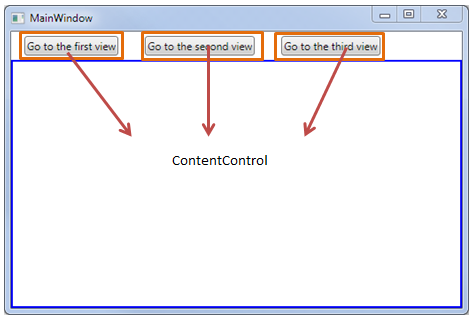
To show you an example, in the MainWindow we create 3 buttons to switch between the 3 views and a ContentControl to host the views, wrapped in a blue border. There is one command for each button to navigate to each view and the ContentControl is in binding with CurrentViewModel.
<StackPanel Margin="0,5" Orientation="Horizontal">
    <Button Margin="15,0"
            Command="{Binding ShowFirstViewCommand}"
            Content="Show first view" />
    <Button Margin="15,0"
            Command="{Binding ShowSecondViewCommand}"
            Content="Show second view" />
    <Button Margin="15,0"
            Command="{Binding ShowThirdViewCommand}"
            Content="Show third view" />
</StackPanel>
<ContentControl Content="{Binding CurrentViewModel}" />
This is the MainViewModel that makes the navigation:
class MainWindowViewModel : ViewModelBase
{
    public ViewModelBase CurrentViewModel
    {
        get { return _currentViewModel; }
        set { Set(ref _currentViewModel, value); }
    }
    private ViewModelBase _currentViewModel;

    public RelayCommand ShowFirstViewCommand { get; private set; }

    public RelayCommand ShowSecondViewCommand { get; private set; }

    public RelayCommand ShowThirdViewCommand { get; private set; }

    private readonly FirstViewModel _firstViewModel;
    private readonly SecondViewModel _secondViewModel;
    private readonly ThirdViewModel _thirdViewModel;

    public MainWindowViewModel(FirstViewModel firstViewModel,
				SecondViewModel secondViewModel, ThirdViewModel thirdViewModel)
    {
        _firstViewModel = firstViewModel;
        _secondViewModel = secondViewModel;
        _thirdViewModel = thirdViewModel;
        ShowFirstViewCommand = new RelayCommand(ShowFirstView);
        ShowSecondViewCommand = new RelayCommand(ShowSecondView);
        ShowThirdViewCommand = new RelayCommand(ShowThirdView);
    }

    private void ShowFirstView()
    {
        CurrentViewModel = _firstViewModel;
    }

    private void ShowSecondView()
    {
        CurrentViewModel = _secondViewModel;
    }

    private void ShowThirdView()
    {
        CurrentViewModel = _thirdViewModel;
    }
}
Bootstrap the application
To initialize the application we will use Castle Windsor. You can use whatever container you like, all are similar.
On App.xaml.cs we override the OnStartup event and we register all the components. Then we resolve the MainWindow, which will resolve all other dependencies automatically.
We must remove StartupUri from App.xaml.
public partial class App : Application
{
    private WindsorContainer container;

    protected override void OnStartup(StartupEventArgs e)
    {
        base.OnStartup(e);
        container = new WindsorContainer();
        container.Register(Component.For<FirstViewModel>());
        container.Register(Component.For<SecondViewModel>());
        container.Register(Component.For<ThirdViewModel>());
        container.Register(Component.For<MainWindowViewModel>());
        container.Register(Component.For<MainWindow>());

        var mainWindow = container.Resolve<MainWindow>();
        mainWindow.ShowDialog();
    }
}
Navigation from inside a ViewModel
Another type of navigation is the one when we need to change page from the current ViewModel, but we don’t have access from the MainWindow. This is the case of master-details application, when we have a list of items and we double click on an item and the view changes.
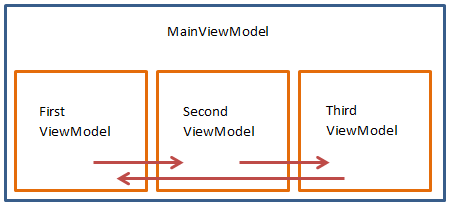
In the sample application we create one button in each viewmodel to navigate to the next viewModel. This means that from FirstViewModel we go to SecondViewModel, from SecondViewModel we go to the third one, and then we go back to the first one.
The problem is that the ContentControl is held by the MainWindow, and we can’t get a reference to MainWindowViewModel on FirstViewModel, because it will create a circular reference and the container will not be able to create the object.
To notify the MainWindow that we need to change page, we will use the Mediator pattern (the Messenger of MVVM Light). We send a ChangePage message to the MainWindowViewModel, and the MainWindowViewModel will take care of changing page.
To show an example we add a button on each view to navigate to the next view.
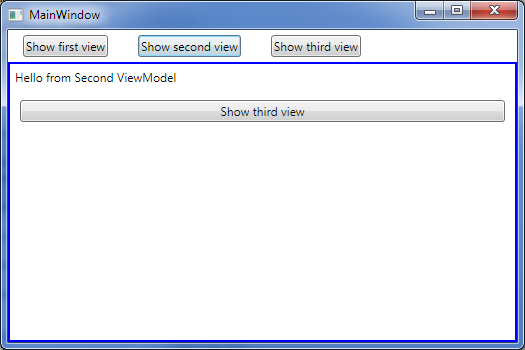
Then we add a command to each view to send a “change page” message containing the type of the ViewModel that we want to show.
public RelayCommand ShowSecondViewCommand { get; private set; }

public FirstViewModel()
{
    ShowSecondViewCommand = new RelayCommand(ShowSecondView);
}

private void ShowSecondView()
{
    Messenger.Default.Send(new ChangePage(typeof(SecondViewModel)));
}
In the MainWindowViewModel we subscribe to ChangePage messages, so we can switch the view.
public MainWindowViewModel(FirstViewModel firstViewModel, …)
{
    […]
    Messenger.Default.Register<ChangePage>(this, ChangePage);
}

private void ChangePage(ChangePage message)
{
    if (message.ViewModelType == typeof (FirstViewModel))
    {
        ShowFirstView();
    }
    else if (message.ViewModelType == typeof(SecondViewModel))
    {
        ShowSecondView();
    }
    else if (message.ViewModelType == typeof(ThirdViewModel))
    {
        ShowThirdView();
    }
}
And this is the code for the Change Page message class:
public class ChangePage
{
    public Type ViewModelType { get; private set; }

    public ChangePage(Type viewModelType)
    {
        ViewModelType = viewModelType;
    }
}
Download sample application
The sample application, including the source code, can be downloaded on my GitHub repository.
Great tutorial! I am having an issue where the View is re-created every time it is shown (the constructor is called each time). Is there a way to stop this from happening so that the View keeps it’s state, like the ViewModel does?
Thanks.
I fixed this issue with the solution from this Stack Overflow question: https://stackoverflow.com/questions/38468786/mvvm-datatemplate-creates-a-new-view
Thanks, great read. If i dont want to use MVVM light. Is it possible to use a Command of ICommand and call a MainViewModel method from this Command to change the Views?