This article is part of a series that explains how to write an HMI with C# and WPF.
Part 1: getting started with MVVM and plc driver
Part 2: this article
Navigation in WPF is one of the most complicated topics, because it can be implemented in many different ways, but it can make your application very complex to handle when it starts growing.
In this article we will see how PRISM framework implements the navigation, and how to use it in our HMI.
We will use as a starting point the HMI that we built in the first article of this series.
Watch the video on YouTube
Previous HMI requirements
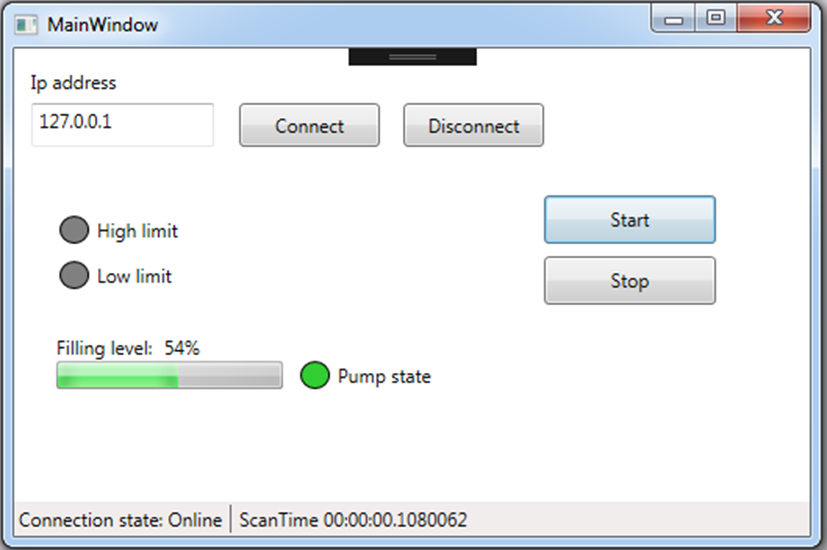
In the previous article we developed a simple HMI that:
- starts and stops a pump
- displays the filling level of a tank
New HMI requirements
Now the new requirements are:
- The pumps’ speed has to be configurated
- The configuration has to be put in a separate page
This means that we have to :
- Create a menu to navigate to the main page and the settings page
- Extract the main page from the main window
- Add a settings page
- Extract the status bar from the two pages
- Make the PLC service global so we can use it in all our pages
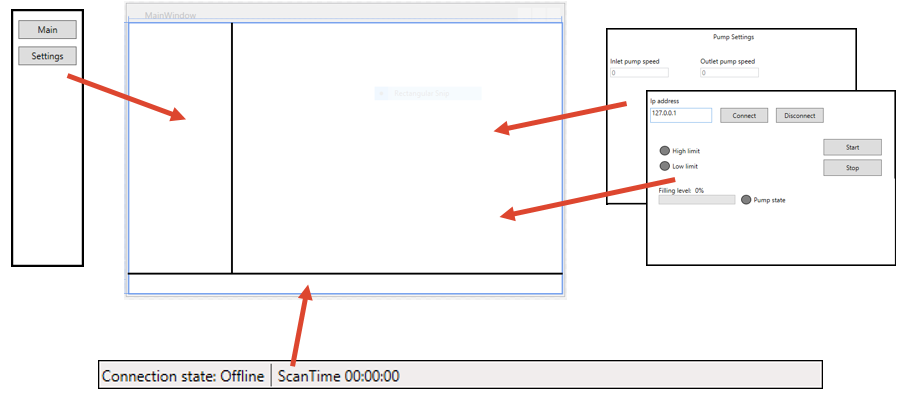
This is the new UI that we are going to build.
Creating Views and ViewModels
To create and swap different pages in WPF, the approach is usually to create UserControls (called Views) that are contained in a ContentControl. The ContentControls (regions) are hosted in a Window, and their functionality is just to host and change the UserControls.
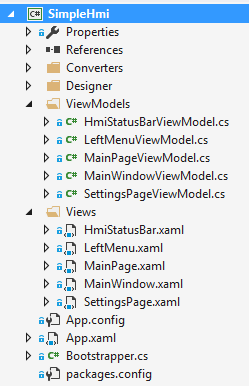
So to create our application, first we need to create all our Views and ViewModels in the project.
Access to the PLC service from the regions
In the previous article, we created the Plc service inside the MainViewModel with this code
public class MainWindowViewModel : BindableBase
{
    private S7PlcService _plcService;

    public MainWindowViewModel()
    {
        _plcService = new S7PlcService();
        ....
Now that we have multiple Views and ViewModels, we need to use the PlcService inside all the ViewModels, so we can not keep it local in MainViewModel anymore.
A standard way to handle global services is to use Dependency Injection, and in particular Constructor Injection. We can inject the PlcService in the constructors of our ViewModels.
The service will be provided by a DI container (Autofac in this example), which will handle all the dependencies.
For example MainPageViewModel needs only the PlcService, so this is its constructor:
class MainPageViewModel : BindableBase
{
	IPlcService _plcService;

	public MainPageViewModel(IPlcService plcService)
	{
    	_plcService = plcService;
		......
Now that every ViewModel has access to the Plc, we can subscribe to the the ValueRefreshed event to synchronize the ViewModel data with the plc data.
public MainPageViewModel(IPlcService plcService)
{
    _plcService = plcService;
    _plcService.ValuesRefreshed += OnPlcServiceValuesRefreshed;
}

private void OnPlcServiceValuesRefreshed(object sender, EventArgs e)
{
	PumpState = _plcService.PumpState;
	HighLimit = _plcService.HighLimit;
	LowLimit = _plcService.LowLimit;
	TankLevel = _plcService.TankLevel;
}
We can use the same approach also with the other ViewModels. You can find the sources here: ViewModels
As you noticed we are not using S7PlcService, but we are using an interface. It is common to abstract the services and to use the interfaces because it’s easier to have multiple implementation of the services. For example we have a PlcService that uses a S7 plc, and we will have an implementation that will just display values for Design data.
Setting up a DI container with PRISM
When we use Dependency Injection, we have to configure the DI container that will be responsible for creating our objects.
PRISM supports natively the most famous containers, like Unity, MEF, Autofac, StructureMap, Ninject, etc.
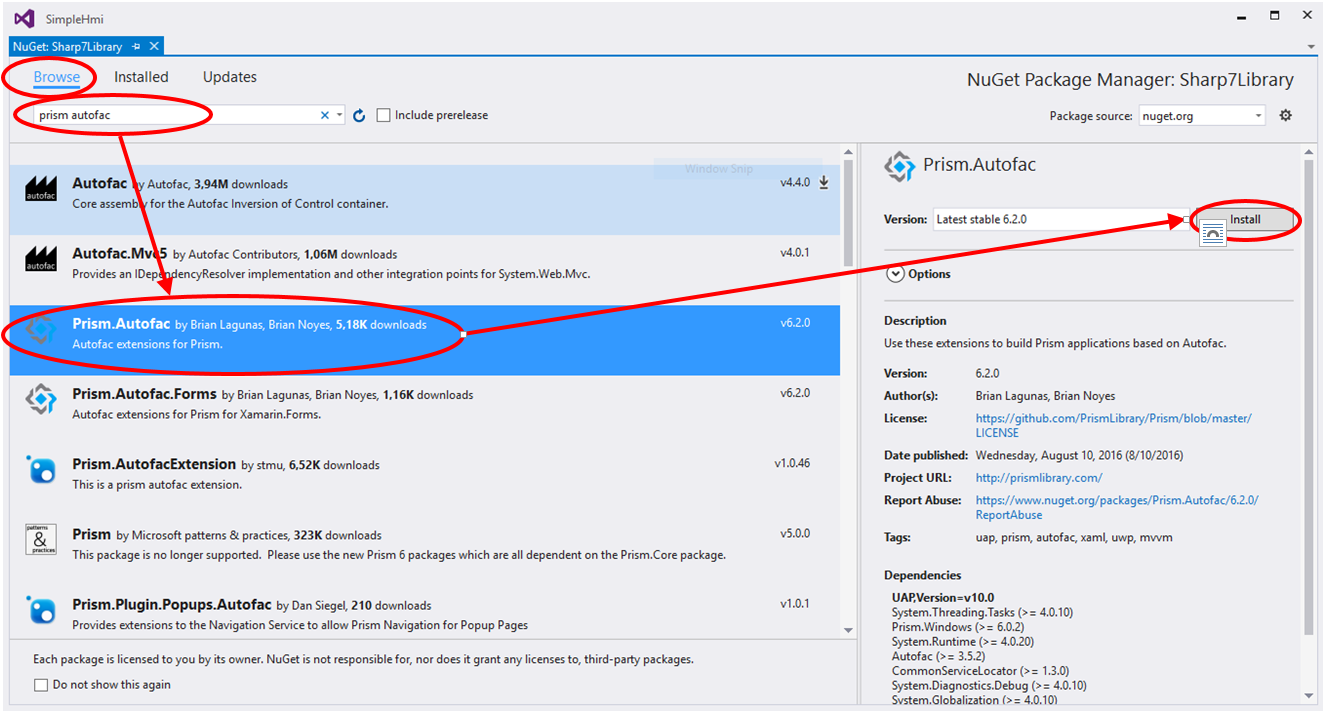
In this article I will use Autofac. To install Autofac for PRISM we need to go to “Manage NuGet packages”, select the “Browse” tab, write “Autofac PRISM” in the search bar and install the “Prism.Autofac” package.
After installing Autofac we have to configure our project to use it.
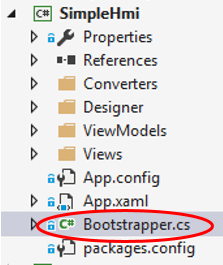
First we have to create a Bootstrapper class and to override the methods that create the Shell.
class Bootstrapper : AutofacBootstrapper
{
    protected override DependencyObject CreateShell()
    {
        return Container.Resolve<MainWindow>();
    }

    protected override void InitializeShell()
    {
        Application.Current.MainWindow.Show();
    }
}
Then we have to delete from App.xaml the StartupUri
<Application x:Class="SimpleHmi.App"
             xmlns="http://schemas.microsoft.com/winfx/2006/xaml/presentation"
             xmlns:x="http://schemas.microsoft.com/winfx/2006/xaml"
             xmlns:local="clr-namespace:SimpleHmi">
             <!-- Remove this line: StartupUri="Views/MainWindow.xaml" -->
And from App.xaml.cs we have to override OnStartup to use our Bootstrapper.
public partial class App : Application
{
    protected override void OnStartup(StartupEventArgs e)
    {
        base.OnStartup(e);
        var bootstrapper = new Bootstrapper();
        bootstrapper.Run();
    }
}
Register the PlcService in the DI container
We mentioned before that “something” has to provide to the ViewModels the services that they need. When you use Dependency Injection, it’s the container that has this responsibility.
If we want the container to create the services, we have to register the services into the container.
To do this, we have to override in the Bootstrapper the ConfigureContainerBuilder method. Also in the case of PlcService (and the most of services) we have to mark the Registration as Single Instance.
This because Autofac by default creates a new instance of the registered class every time it’s asked.
Instead of that we want a single global instance for the whole application (a Singleton), so we have to write “.SingleInstance”. In the YouTube video I show what happens if we don’t mark it as SingleInstance and how to debug these situations.
This is the code to register the PlcService, notice that we are registering both the service and the interface.
protected override void ConfigureContainerBuilder(ContainerBuilder builder)
{
    base.ConfigureContainerBuilder(builder);
    builder.RegisterType<S7PlcService>().As<IPlcService>.SingleInstance();
}
Registering the Views
Once we registered our services in the container, we also have to register our Views.
So in the Bootstrapper, in the ConfigureContainerBuilder method, we have to add the code to register the regions for navigation:
protected override void ConfigureContainerBuilder(ContainerBuilder builder)
{
    ...
    builder.RegisterTypeForNavigation<MainPage>("MainPage");
    builder.RegisterTypeForNavigation<LeftMenu>("LeftMenu");
    builder.RegisterTypeForNavigation<HmiStatusBar>("HmiStatusBar");
    builder.RegisterTypeForNavigation<SettingsPage>("SettingsPage");
}
As you see, the code to register regions is different from the code to register the services.
In particular, the biggest difference is that it requires a string.
The string is used as a URI for the navigation.
In particular it is used as a parameter for the NavigateTo method.
Using the ViewModel locator
Registering the view is not enough to resolve the Views and the ViewModels. We also need to use the ViewModelLocator of Prism.
ViewModel locator is a known approach in WPF to inject ViewModel into the DataContext of the View. Also the ViewModelLocator makes use of DI container to resolve the ViewModel, so we can use constructor injection in the ViewModel and get all the dependencies resolved automatically.
In case of Prism, to use ViewModel locator you just need to add to the Views the line:
prism:ViewModelLocator.AutoWireViewModel="True"
This line has to be added on the declaration of the View. For example for MainWindow this will resolve the MainWindowViewModel:
<Window x:Class="SimpleHmi.Views.MainWindow"
        ...
        xmlns:prism="http://prismlibrary.com/"
        prism:ViewModelLocator.AutoWireViewModel="True"
		...
        Title="MainWindow" mc:Ignorable="d" >
It’s really important that you understand how ViewModelLocator works.
It loads a ViewModel for a certain View based on this convention:
- Views go in a folder called “Views”, ViewModels go in a folder called “ViewModels”
- Views class name may or may not end with “View”, ViewModels class name must end with “ViewModel”
- The namespace have to be the same, for example if I have a View in the NameSpace “SimpleHmi.Views”, I must put the ViewModel in the NameSpace “SimpleHmi.ViewModels”
This is the code that PRISM uses for this convention, taken the PRISM sources:
var viewName = viewType.FullName;
viewName = viewName.Replace(".Views.", ".ViewModels.");
var viewAssemblyName = viewType.GetTypeInfo().Assembly.FullName;
var suffix = viewName.EndsWith("View") ? "Model" : "ViewModel";
var viewModelName = String.Format(CultureInfo.InvariantCulture, "{0}{1}, {2}", viewName, suffix, viewAssemblyName);
return Type.GetType(viewModelName);
Creating the regions
Now that all the services and the views have been registered from the container and the ViewModels are resolved from the ViewModelLocator, we can create the regions that will contain our Views.
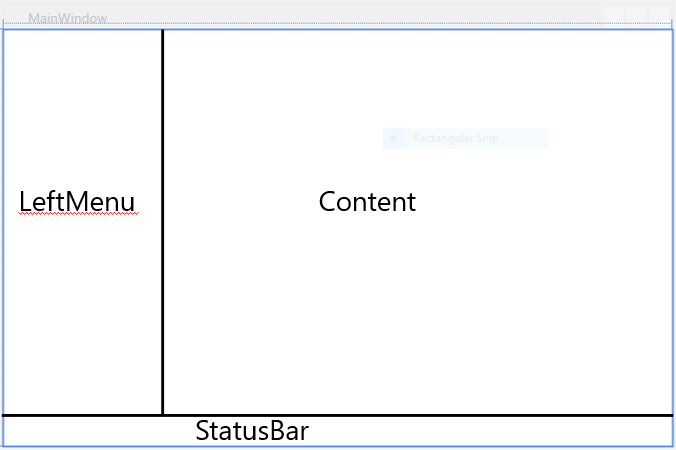
In the MainWindow we create 3 ContentControls and we place them in a Grid.
Also we have to assign a RegionName to every ContentControl.
We do this using prism:RegionManager.RegionName attribute, like in the code below:
<Grid>
    <Grid.ColumnDefinitions>
        <ColumnDefinition Width="Auto" />
        <ColumnDefinition />
    </Grid.ColumnDefinitions>
    <Grid.RowDefinitions>
        <RowDefinition Height="*" />
        <RowDefinition Height="Auto" />
    </Grid.RowDefinitions>
    <ContentControl Grid.Row="0"
                    Grid.Column="0"
                    prism:RegionManager.RegionName="{x:Static infrastructure:Regions.LeftMenuRegion}" />
    <ContentControl Grid.Row="0"
                    Grid.Column="1"
                    prism:RegionManager.RegionName="{x:Static infrastructure:Regions.ContentRegion}" />
    <ContentControl Grid.Row="1"
                    Grid.ColumnSpan="2"
                    prism:RegionManager.RegionName="{x:Static infrastructure:Regions.StatusBarRegion}" />
</Grid>
As you can see from the code we are using a constant for the RegionName, instead of a string.
The constants for the regions are usually put into a separate project called Infrastructure, for a better mainteinability of the project.
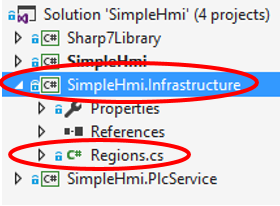
public class Regions
{
    public static string ContentRegion = "ContentRegion";
    public static string LeftMenuRegion = "LeftMenuRegion";
    public static string StatusBarRegion = "StatusBarRegion";
}
Assigning the Views to the Regions
To assign the Views to the Regions we need to use the PRISM RegionManager.
We can assign the regions in the MainWindowViewModel, which is called as soon as the MainWindow is created.
This is the code to assign the Views to the regions:
private readonly IRegionManager _regionManager;

public MainWindowViewModel(IRegionManager regionManager)
{
    _regionManager = regionManager;
    _regionManager.RegisterViewWithRegion(Regions.ContentRegion, typeof(MainPage));
    _regionManager.RegisterViewWithRegion(Regions.StatusBarRegion, typeof(HmiStatusBar));
    _regionManager.RegisterViewWithRegion(Regions.LeftMenuRegion, typeof(LeftMenu));
}
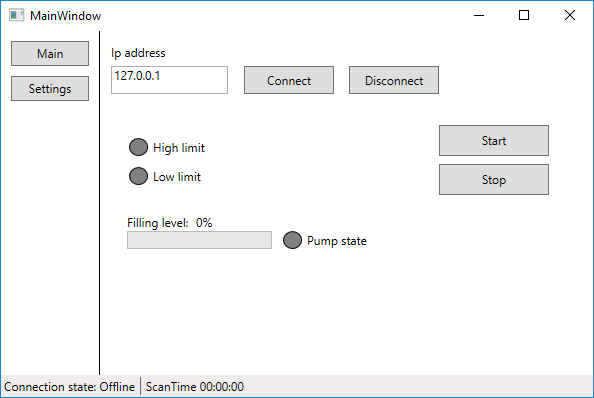
Running the application will show the window with all the regions loaded:
Navigate between regions
To navigate between regions we also need to use the RegionManager.
In the LeftMenu we assign the commands to the two buttons that are responsible for the change page.
<Button Content="Main"
		Command="{Binding NavigateToMainPageCommand}" .../>
<Button Content="Settings"
		Command="{Binding NavigateToSettingsPageCommand}" .../>
Then in the LeftMenuViewModel we provide the implementation of the commands by using RegionManager and PRISM DelegateCommands.
To change View inside a region we have to use the method RequestNavigate. This takes into input the region that we are targeting and the url of the View.
The url is the name of the View that we assigned to it when we registered the View in the Bootstrapper (usually the name is the same of the class name).
class LeftMenuViewModel
{
    public ICommand NavigateToMainPageCommand { get; private set; }

    public ICommand NavigateToSettingsPageCommand { get; private set; }

    private readonly IRegionManager _regionManager;

    public LeftMenuViewModel(IRegionManager regionManager)
    {
        _regionManager = regionManager;

        NavigateToMainPageCommand = new DelegateCommand(() => NavigateTo("MainPage"));
        NavigateToSettingsPageCommand = new DelegateCommand(() => NavigateTo("SettingsPage"));
    }

    private void NavigateTo(string url)
    {
        _regionManager.RequestNavigate(Regions.ContentRegion, url);
    }
}
Implementing the settings page
Let’s see now how settings page is implemented.
The settings are usually stored in the plc, in some retentive area. So we need to load the settings when we load the page and be able to change them if needed.
To load the settings from the plc when the ViewModel is loaded, we need to use the INavigationAware interface.
Here is the code of INavigationAware interface:
class SettingsPageViewModel :BindableBase, INavigationAware
{
    public void OnNavigatedTo(NavigationContext navigationContext)
    {
        InletPumpSpeed = _s7PlcService.InletPumpSpeed;
        OutletSpeed = _s7PlcService.OutletPumpSpeed;
    }

    public bool IsNavigationTarget(NavigationContext navigationContext)
    {
        return true;
    }

    public void OnNavigatedFrom(NavigationContext navigationContext)
    {

    }
}
The interface INavigationAware defines 3 methods:
- OnNavigatedTo is called when the page is loaded, so here we refresh the values from the plc.
- IsNavigationTarget is called before the page is loaded and must return true, unless you want to forbid the access to the page.
- OnNavigatedFrom is called when we are leaving the page.
Once we loaded the data from the plc, it’s trivial to modify them by using the plc service.
You can check the whole code of SettingsViewModel on GitHub: SettingsPageViewModel
Design time data
One of the best features of WPF is the possibility to use design data while editing the User Interface. The problem that we face when using dependency injection is that DesignTime is not supported anymore because the ViewModels’ constructor needs to be without any parameter, but we are resolving the services from the container exactly in the constructor.
Also to use the DesignData we should assign the DataContext in the xaml data, but in our case we have the ViewModel locator that assigns it automatically.
To use designer support, we can create a DesignerViewModel with a parameterless constructor and assign it to the View.
This is the code to create the DesignTimeViewModel for the MainPage:
class DesignMainPageViewModel : MainPageViewModel
{
    public DesignMainPageViewModel() : base(new DesignPlcService())
    {
    }
}
As you see it’s not complicated, but it also needs a DesignPlcService. You can see the code here.
To add the DesignTimeViewModel to the View, we have to add these lines to the View xaml:
d:DataContext="{d:DesignInstance design:DesignMainPageViewModel, IsDesignTimeCreatable=True}"
As you see we are using a DataContext prefixed with the “d” letter. That “d” means that we are ignoring that DataContext at runtime, but we are initializing it when the WPF designer is in use.
Here is the example for MainPage:
<UserControl x:Class="SimpleHmi.Views.MainPage"
             xmlns:d="http://schemas.microsoft.com/expression/blend/2008"
             xmlns:mc="http://schemas.openxmlformats.org/markup-compatibility/2006"
             mc:Ignorable="d"
			 ...
             xmlns:design="clr-namespace:SimpleHmi.Designer"
             d:DataContext="{d:DesignInstance design:DesignMainPageViewModel, IsDesignTimeCreatable=True}"
			 ...>
Creation of a dummy plc service
Given how easy it is to swap the service implementation with this architecture, we can create a plc service that replicates the behavior of the S7 plc program, but in C#.
This will give us the possibility to test the application without the need of the real plc.
The code for the DummyPlcService is here.
Changing the type of PlcService in use is really simple, we have just to open the Bootstrapper class and comment/uncomment the service that we want to use.
protected override void ConfigureContainerBuilder(ContainerBuilder builder)
{
    ...
    //builder.RegisterType<S7PlcService>().As<IPlcService>().SingleInstance();
    builder.RegisterType<DummyPlcService>().As<IPlcService>().SingleInstance();
    ...
}
Download the solution
As usual, you can download the code and the plc program on GitHub.
Would you recommend Prism & Autofac over MVVMLight and Castle Windsor? As per your previous article “WPF navigation with dependency injection (DI/IOC)”.
I’m interested to hear your thoughts on why you chose one vs the other, i.e. Prism vs. MVVM Light, Autofac vs. Castle Windsor.
Thanks for another great article, these examples are really helpful for me.
I used MVVM Light a lot in the past, as I believed that PRISM was over-engineered and too complicated to get started with.
In the recent projects I had to use the latest version of PRISM, and I saw that it has the exact same functionalities of MVVM Light, (Databinding, Commands, Messenger and ViewModelLocator), but it also offers Navigation and Modularity.
Also it has been simplified and tweaked a lot from the previous versions, and now you can really pick only what you need.
Navigation in particular saves you from writing a lot of boilerplate code to get it right, and it is extensively documented on YouTube videos and Pluralsight videos.
So if I had to start a new project today, I would use PRISM because it takes me less time to get everything up and running.
About the container, I used AutoFac because PRISM doesn’t support Windsor out of the box. Still, the containers offers the same basic functionalities and it’s just a matter of preference what you want to use.
I believe that if you have a project that has a navigation based on that article, it is trivial to convert it to PRISM.
Thanks very much for your detailed response, it perfectly answers my question.
Why not used ModuleCatalog ?
I saw many tutorial using this and I’m confused a little bit.
You registered the view in the RegionManager.
Modules were not the scope of the article, but I always use Modules in my application. I the latest applications I use Autofac, and it comes with its own modularity, so I don’t use ModuleCatalog.
http://docs.autofac.org/en/latest/configuration/modules.html
Thanks, very helpful! Congratulation! =)
Great article, you are doing an amazing job. I visit your page over and over again. Knowledge base is huge. Thank you, keep it up
This is fantastisk work, thanks for sharing.
I am trying to change the background on page 1 to a image, but it is giving me some trouble, is there a easy way to accomplice this, I have a feeling I am not getting my image place right in the project.
I get the image in and it looks good, the system compiles without error, but when I run the program, the bootstrapper crashes with an long list of problems, starting with: “Prism.Regions.UpdateRegionsException: ‘An exception occurred while trying to create region objects.
– The most likely causing exception was: ‘System.Reflection.TargetInvocationException: Exception has been thrown by the target of an invocation. —> ”
I you know where I am doing wrong, please give me a hint.
Thanks again
/Flemming
It helped writing about the problem, I just needed to enable the “copy to the output folder” option, problem solved 🙂
I don’t know exactly what you are doing. When I start, the form page freezes, Debug doesn’t work.